28 May 2009

Labane 1

It begins with yogurt. And becomes very yummy.


When I made my first batch of yogurt I was so overwhelmed by the amount of yogurt I had on my hands that I ended up using over half of it to try making labane. Labane is basically yogurt that has had a lot of the excess liquid drained off so that it is the texture of sour cream. I strained my yogurt by dumping it in a cloth-lined colander set over a bowl to catch the liquid. I had an old, clean rice bag that I used, but any piece of clean cotton cloth will work.


After about 24 hours, the yogurt looked like this: labane!


Amazing how much liquid drains off! Probably more with
homemade yogurt which is runnier than the store-bought stuff.


I added salt to taste and a few glugs of olive oil . . .


With homemade pita, YUM!


To serve the labane (or "labna" or "labaneh") I spread it in a pretty bowl, drizzled more olive oil on top--use virgin oil for the best flavor!--and sprinkled it with za'atar. Za'atar is an herb mix popular in Israel and other Middle-Eastern countries. It usually contains hyssop (an oregano relative), toasted sesame seeds, and salt.

Labane really is a great blank palate for any fresh or dried herbs that you like. Get as creative as you want with garlic, peppers, onions, ranch mix, etc. and use as a spread on sandwiches or a dip for crackers.

Taste-Tester(s) Say(s): "I could eat this all day!"

Cook's Word: Too easy and delicious not to try. Some instructions call for putting salt and olive oil in the yogurt before straining. I did the salt once, but still had to add it to taste at the end of the process. And, I know I said it before, but use virgin olive oil! It makes a huge difference in the taste when drizzled on top for serving.

21 May 2009

Here and There

Of course, foods are being cooked and baked in the kitchen even when I'm not blogging about it. I couldn't possibly do a post about every breakfast, lunch, and dinner that gets eaten here. And who wants to read about cold cereal, eggs and potatoes for supper, or tortilla snacks (well, maybe those . . .)?


So, here are a few of those foods that might not ever merit their own post:


Zucchini Guts Stir-Fry: Sounds appetizing, right? Well, what do you do with the dolma zucchini innards? The first step in my recipe was to cure them in the fridge for a few days, almost forgetting about them until I needed a quick dinner one evening. I started by searing some thick slices of onion in hot olive oil and a few splashes of soy sauce. Add zucchini parts (insides and peels) and fry, stirring often, until tender-crisp. Salt and pepper. Eat!


Tomato-y Rice: I served the zucchini over rice that I cooked in the leftover tomato sauce from the dolmas--it gave it a slightly Spanish-rice flavor. Taste-tester notes that this meal involves a nice combination of colors and textures (the zucchini peels retained a slight crunch). Cook particularly likes the crisp soy sauce-flavored onions in the stir-fry.


The Clymer Stack: This is a breakfast dish inspired by some friends by the name of "Zook". You know who you are. Their stack comes from Pennsylvania Amish tradition and is a layering of fried scrapple, molasses, baked beans, milk-soaked toast, and a fried egg. My stack you will see below: toasted bread, fried egg, and spicy sausage gravy. Taste-tester appreciates that the toast is not soggy as in the Zook Stack. Cook would mention that the spicy sausage gravy, while quite delicious, is almost too spicy for morning food.


Vanilla Chai Cupcakes: This is just a teaser, because these cupcakes are going to get their own post, complete with recipe when I get it perfected to my taste. Warning: THESE SMELL UTTERLY SCRUMPTIOUS WHILE BAKING AND YOU MAY BE TEMPTED TO EAT ONE AS SOON AS YOU CAN GET YOUR HANDS ON IT (without burning them)!


Add some Fisher Family Butter-Cocoa Frosting, and ooooh la la!!


Cook's Word: Check back, baby. You may want to try this at home!

19 May 2009

How Does Your Yogurt Grow?

Yogurt. So many uses, such little time. And that's generally the problem with making your own. It takes so much time! Here's how the recipe I used goes:

Put milk in crock pot on low for 2.5 hours.
Turn crock pot off and let sit for 3 hours.
Add yogurt culture.
Wrap whole thing in towel and let sit 8 hours.

Basically the stuff sits, and the cook waits.

My first attempt last Thursday was fraught with many worries. I was worried my crock pot wouldn't hold the heat properly. I was worried about having bought ultra-pasteurized milk when the recipe explicitly stated: "pasteurized and homogenized is fine, but do not use ultra-pasteurized." Whoops. I turned the crock pot on. I turned it off. And I waited. And I worried. And for all that worrying, I forgot about it.

I called my husband at work: "Did you check the yogurt when you got up this morning?" He forgot too. I fretted to my co-workers: "It probably completely flopped. I bet it's just warm milk." And so on . . .

At 11:00 am--well after the stuff had been sitting for 8 hours--I finally saw the results of my (well, the yogurt's, really) labors.


Not bad. The recipe had forewarned that homemade yogurt is thinner than what you buy in the store. And so it is. I was ecstatic! Right off I mixed some of that lovely, runny yogurt with water and salt and drank some ("ayran" is a very refreshing drink when you get used to it). More of it was dumped into a colander for making labane (check back later), and the rest went into the fridge. I have wisely kept 1/2 cup in a separate container labeled: "Yogurt Starter: Please do not eat!" for my next batch tonight.

If you want to try this crock pot version of yogurt visit Nourishing Days. I originally got the recipe off of a blog called "Keeping the Home" which has fascinating instructions for making your own toothpaste, deoderant and the like, but the yogurt recipe is no longer available there. The one I'm sending you to has the same directions.

Enjoy!

Cook's Word: This is too much fun!

P.S. My apologies to Keeping the Home. The yogurt recipe is indeed still available there.

18 May 2009

Mushy-Butt Zucchini Dolma II

When I made the zucchini dolma last Friday, there were two peppers and one zucchini that didn't fit in the pan. I stowed them in a smaller pot in the fridge to cook at a later date. Sunday afternoon, between church and running off to a graduation, I took the opportunity. To try to correct some of the flavor, I simmered the dolma in tomato sauce with garlic added to it.


Taste-Tester(s) Say(s): "It tastes more tomato-y; it has more flavor"

Cook's Word: It still needs a lot more salt and tomato paste in the filling. And it was still mushy. My next attempt may include partially pre-cooking the rice so that the vegetables themselves aren't subjected to too much steaming. When I get it "perfected" I promise I'll post my recipe!

15 May 2009

Mushy-Butt Zucchini Dolma

For my inaugural post, I was hoping for a huge triumph in the kitchen. What I ended up with was (as per post title) "mushy-butt" dolma. Well, alright, they weren't a total failure (read "waste of time and money"), but they weren't the dolma of my dreams. "Dolma", by the way, means "stuffed" in Turkish.

The story begins, well, I can't remember exactly. Pick one of the following scenarios: at the thrift store where I picked up the corer/peeler do-hicky; on a Sunday afternoon, discussing Turkish food at length with my new sister-in-law (who also lived in Turkey); or at the grocery store when I spied just the perfect dolma-making zucchini. In any case there was a circumstantial convergence such as produced the following display on my counter:


Having scoured the internet for recipes and gathered all the appropriate materials, I felt eager and equal to the task at hand. Thanks to Almost Turkish Recipes for the inspiration recipe.


The corer/peeler do-hicky does its thing to
the zucchinis--insides have been stashed in
the fridge for a stir-fry experiment later on


The stuffing: rice, cooked ground beef, chopped onion,
whizzed tomato, fresh parsley, dried oregano,
Turkish red pepper flakes, black pepper, salt, and a
leeeetle bit of olive oil. This stuff smelled a-MAZ-ing!


The stuffing stuff way outnumbered the zucchini
so we ran over to Save and Prosper for some green
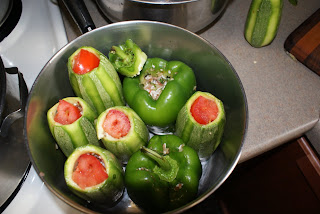
peppers. These babies are stuffed and ready to cook!


. . . and cooked . . .


Eaten with homemade yogurt (another
post about that to come, I promise)

Taste-Tester(s) Say(s): "Yummy, yummy in my tummy."

Cook's Word: On my little recipe card I wrote, "needs more salt! Add garlic to filling & tomato paste--don't use oregano!" In other words it wasn't what I was expecting, but I've got some ideas and am determined to try again. Also, I'll try not to cook it to "mushy-butt" stage again.